Many photographers dread pulling out their tripod, because they're a
bit on the heavy side and can be a hassle to carry around, especially
when out in nature. However, using a tripod can make the difference
between an amateur shot and an epic shot.
Taking the time to set up the three-legged gadget that every
photographer should have in their toolbox can benefit the end results in
compelling ways.
Steady Means Sharp
The
best argument for using a tripod is to increase the camera's stability.
That's what they were made for, and when stability is on your side,
razor-sharp images are more likely to be in your future. The extra bit
of time it takes to unpack and set up a tripod tends to discourage a lot
of amateur photographers. Yes, it does take extra time. Nevertheless,
isn't it better to ensure a selection of sharper images? If you spend
all that time heading out into the woods, fields, rivers, mountains,
oceans or wherever else your photography muse takes you, then certainly
coming home with blurred images (and possibly a few ticks or mosquito
bites, too) will defeat the purpose.
To forgo a tripod and only
hand holding a camera in low light increases the odds that the shot will
be blurry, especially with a shutter speed of less than 1/250. This
will be especially evident when the image is enlarged.
In
photography, the equation is simple: Shaking equals blurring. With a
tripod, the shutter can stay open as long as needed -- minutes and even
hours -- and as long the camera remains still, the picture won't be
blurry. Note that there will be times when Mother Nature can interfere,
such as during high winds, which can obviously rattle a tripod and
camera around a bit. In conditions such as these, further adjustments
will need to be made.
Setting Up and Setting Seconds
The
best approach for setting up a tripod is to find solid and stable
footing. Uncertain footing beneath your camera, which can be common in
landscape photography, can be expected. This is why tripods have a
multitude of adjustments. Adjust the individual leg lengths to
accommodate for ground that isn't level. For example, one leg may end up
on a rock while the other two are in sand or dirt.
Once the
camera and tripod are set, use the two second self-timer to ensure your
fingers don't shake the camera. If you aren't sure how to set the
self-timer, check with the camera's user manual, or do a quick Google or
YouTube search. The answer is bound to be out there, especially for
current digital cameras.
Sunsets and City Lights

Shooting a sunset, full moon, or cityscapes are three of the most
popular low light shots. However, any photographic situation that
involves slowing down the camera's shutter speed, such as this sunset
shot I captured in Boise, Idaho, will require a tripod.
Depending
on the ISO setting and which camera mode is set -- Manual, Program or
either Aperture or Shutter priority -- a slow shutter speed (under
1/250) is likely in low light. Naturally the ISO can be set high, such
as 3200 or 6400, to be able to increase the shutter speed, but the end
result could mean a grainier image (for most cameras).
Depending
on the creative effect desired, going with a lower ISO for sharper
images will mean a slower shutter speed and the need for stability. In
this sunset image, I set the ISO at 200, the aperture at f/16, and the
shutter speed at 1/13. I also used a neutral density gradient filter to
mask the sky, allowing even light across the entire image. For added
insurance, I set the self-timer set for two seconds, but I have also
used a remote shutter release, which are very inexpensive and easy to
use.
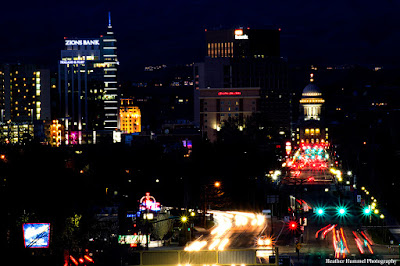
Have you ever wondered how
a photographer captures car lights streaking down the highway, like in
this image of downtown Boise, Idaho? To capture this image, I set up my
Canon on its tripod on a hill overlooking downtown Boise, which was
actually the Boise Depot. I set my ISO, and since I use the Manual
setting, I set the aperture, f/stop, and shutter speed, too. Next, I
waited until the street lights changed from red to green and for traffic
to start moving before pressing the shutter button, which triggered the
two second self-timer. With my camera on a tripod, I set the ISO to
800, which was higher than the sunset image because it was quite a bit
darker and I didn't want the shutter speed to be too slow. The aperture
was set at f/20, and the shutter speed was 5 seconds -- long enough for
the lights to create the stream, but not too long.
As the shutter
remained open, all of the headlights and city lights are recorded onto
the camera's image sensor, creating the streaking effect from the moving
lights while the building lights remained sharp.
Without a tripod, nighttime images turn into a blurred mess. The tripod is what creates truly amazing images.
Take these extra few steps, and you will soon see a big difference in the quality of your images.
Situations That Do Not Use a Tripod
Certainly
there are times when photographers can't or don't use a tripod. These
are usually the photographers in action who develop other skills to
compensate for not utilizing a tripod. They are the ones who may also
need to remain inconspicuous. Photojournalists or underwater
photographers are two great examples. Rarely will they lug the extra
weight of a tripod in the field or under the sea. These photographers
have developed the skill of keeping steady and shooting quickly.
Recommended Tripods:
Manfrotto MKCOMPACTADV-BK Compact Advanced Tripod with 3-Way Head (Black) MeFOTO C1350Q1T Carbon Fiber Roadtrip Travel Tripod Kit (Titanium)
 Sirui T-005KX 52" Aluminum Alloy Tripod with C-10X Ball Head & Case (Black)
This article originally appeared on the
Huffington Post.
Follow Heather Hummel on Twitter:
www.twitter.com/HeatherHummel
Want to learn how to master low light photography and to capture your own low-light photos? My book MASTER LOW LIGHT PHOTOGRAPHY is available on Amazon.


 Where else can you find Jim Jordan's work? Here are just a few places:


